How to Connect Xmax to Simplify3D,Simplify3D is a popular slicing software known for its powerful features and user-friendly interface. Xmax, a 3D printer by QIDI Tech, is widely used for its reliability and performance. Connecting Xmax to Simplify3D allows users to leverage the advanced slicing capabilities of Simplify3D, resulting in better print quality and more control over the printing process. This article provides a step-by-step guide on how to connect your Xmax 3D printer to Simplify3D.
What You Need
Before you begin, ensure you have the following:How to Connect Xmax to Simplify3D.
- Simplify3D Software: Ensure you have the latest version of Simplify3D installed on your computer. You can download it from the official Simplify3D website.
- Xmax 3D Printer: Set up and properly configured.
- USB Cable: To connect the Xmax printer to your computer.
- Computer: Running Windows, macOS, or Linux.
Step 1: Install Simplify3D
If you haven’t already installed Simplify3D, follow these steps:How to Connect Xmax to Simplify3D.
- Download Simplify3D:
- Go to the official Simplify3D website.
- Purchase and download the software.
- Install Simplify3D:
- Run the downloaded installer.
- Follow the on-screen instructions to complete the installation.
Step 2: Connect Your Xmax Printer
- Power on Your Printer:
- Ensure your Xmax 3D printer is powered on and ready.
- Connect the USB Cable:
- Connect one end of the USB cable to the Xmax printer and the other end to your computer.
Step 3: Configure Printer Settings in Simplify3D
Now, configure Simplify3D to recognize and work with your Xmax printer.How to Connect Xmax to Simplify3D,
- Launch Simplify3D:
- Open the Simplify3D application on your computer.
- Add a New Printer Profile:
- Go to “Help” > “Configuration Assistant”.
- Select “QIDI Tech” from the list of manufacturers.
- Choose “Xmax” as the printer model.
- Click “Next” to proceed.
- Configure Printer Settings:
- In the “Printer Settings” tab, ensure the settings match your Xmax printer specifications.
- Machine Type: Select “FFF (Fused Filament Fabrication)”.
- Build Volume: Enter the build volume dimensions (typically 300x250x300 mm for Xmax).
- Firmware Configuration: Choose “RepRap (Marlin/Repetier/Sprinter)”.
- Click “Finish” to save the printer profile.
Step 4: Customize Print Settings
Customizing print settings in Simplify3D helps optimize the printing process.
- Select the Printer Profile:
- In the main Simplify3D interface, select the Xmax profile from the drop-down menu.
- Edit Process Settings:
- Click on “Edit Process Settings”.
- Here you can customize various settings such as layer height, print speed, infill percentage, and more.
- Layer Tab:
- Primary Layer Height: Set the layer height (e.g., 0.2 mm for standard quality).
- Top Solid Layers: Set the number of top layers (e.g., 3).
- Bottom Solid Layers: Set the number of bottom layers (e.g., 3).
- Additions Tab:
- Skirt/Brim: Enable skirt or brim to improve adhesion.
- Raft: Enable raft if needed for better first-layer adhesion.
- Infill Tab:
- Infill Percentage: Set the infill percentage (e.g., 20% for general prints).
- Infill Pattern: Choose an infill pattern (e.g., grid, honeycomb).
- Support Tab:
- Enable support structures if your print requires them.
- Customize support settings as needed.
Step 5: Import and Slice a Model
With the printer settings configured, you’re ready to import and slice a 3D model.How to Connect Xmax to Simplify3D.
- Import the 3D Model:
- Click on “Import” to load a 3D model (STL file) into Simplify3D.
- Position the Model:
- Use the move, scale, and rotate tools to position the model correctly on the build platform.
- Slice the Model:
- Click on “Prepare to Print”.
- Simplify3D will slice the model based on the settings you’ve configured.
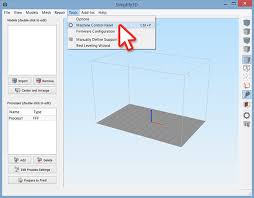
Step 6: Start the Print
After slicing the model, you can start the print.
- Connect to the Printer:
- Click on “Machine Control Panel” in Simplify3D.
- Ensure your Xmax printer is connected via USB.
- Click “Connect”.
- Upload the G-Code:
- Click on “Upload to SD Card” or “Print over USB” to transfer the sliced G-code to your printer.
- Start the Print:
- Once the G-code is uploaded, start the print from the Machine Control Panel.
- Monitor the print to ensure it starts correctly.
Troubleshooting Tips
While connecting Xmax to Simplify3D is generally straightforward, you may encounter some issues. Here are some troubleshooting tips:How to Connect Xmax to Simplify3D.
Connection Issues
- Check USB Cable: Ensure the USB cable is securely connected to both the printer and the computer.
- Restart Devices: Restart both your computer and the Xmax printer.
- Update Drivers: Ensure you have the latest USB drivers installed on your computer.
Print Quality Issues
- Check Settings: Verify that your print settings (layer height, print speed, etc.) are correctly configured.
- Calibrate the Printer: Perform a calibration of your Xmax printer to ensure accurate prints.
- Check Filament: Ensure the filament is of good quality and not causing issues.
Software Issues
- Update Simplify3D: Make sure you are using the latest version of Simplify3D.
- Reinstall Software: If issues persist, try reinstalling Simplify3D.
- How to Connect Xmax to Simplify3D.
Advanced Tips for Optimal Printing
To further enhance your 3D printing experience with Xmax and Simplify3D, consider the following advanced tips:
Fine-Tuning Settings
Experiment with different settings in Simplify3D to achieve the best print quality. Adjust parameters such as temperature, retraction, and cooling to suit the specific filament and model you’re using.
Using Custom Scripts
Simplify3D allows you to add custom scripts for various stages of the printing process. You can use these scripts to automate certain tasks, such as bed leveling or filament changes.
Multiple Processes
For complex prints, use multiple processes in Simplify3D. This feature allows you to apply different settings to different parts of the model, optimizing print quality and strength.
Post-Processing
Consider post-processing techniques such as sanding, painting, or annealing to enhance the appearance and strength of your prints. Simplify3D can help prepare models for these processes by providing support removal and finishing instructions.
Conclusion
Connecting your Xmax 3D printer to Simplify3D opens up a world of possibilities for creating high-quality 3D prints. By following the steps outlined in this guide, you can easily set up and configure your printer, customize print settings, and start printing your favorite models. With its powerful features and user-friendly interface, Simplify3D is an excellent tool to take your 3D printing projects to the next level. Remember to experiment with different settings and techniques to achieve the best results, and enjoy the creative process of 3D printing with Xmax and Simplify3d.